5.03.2010

Can You Guess...

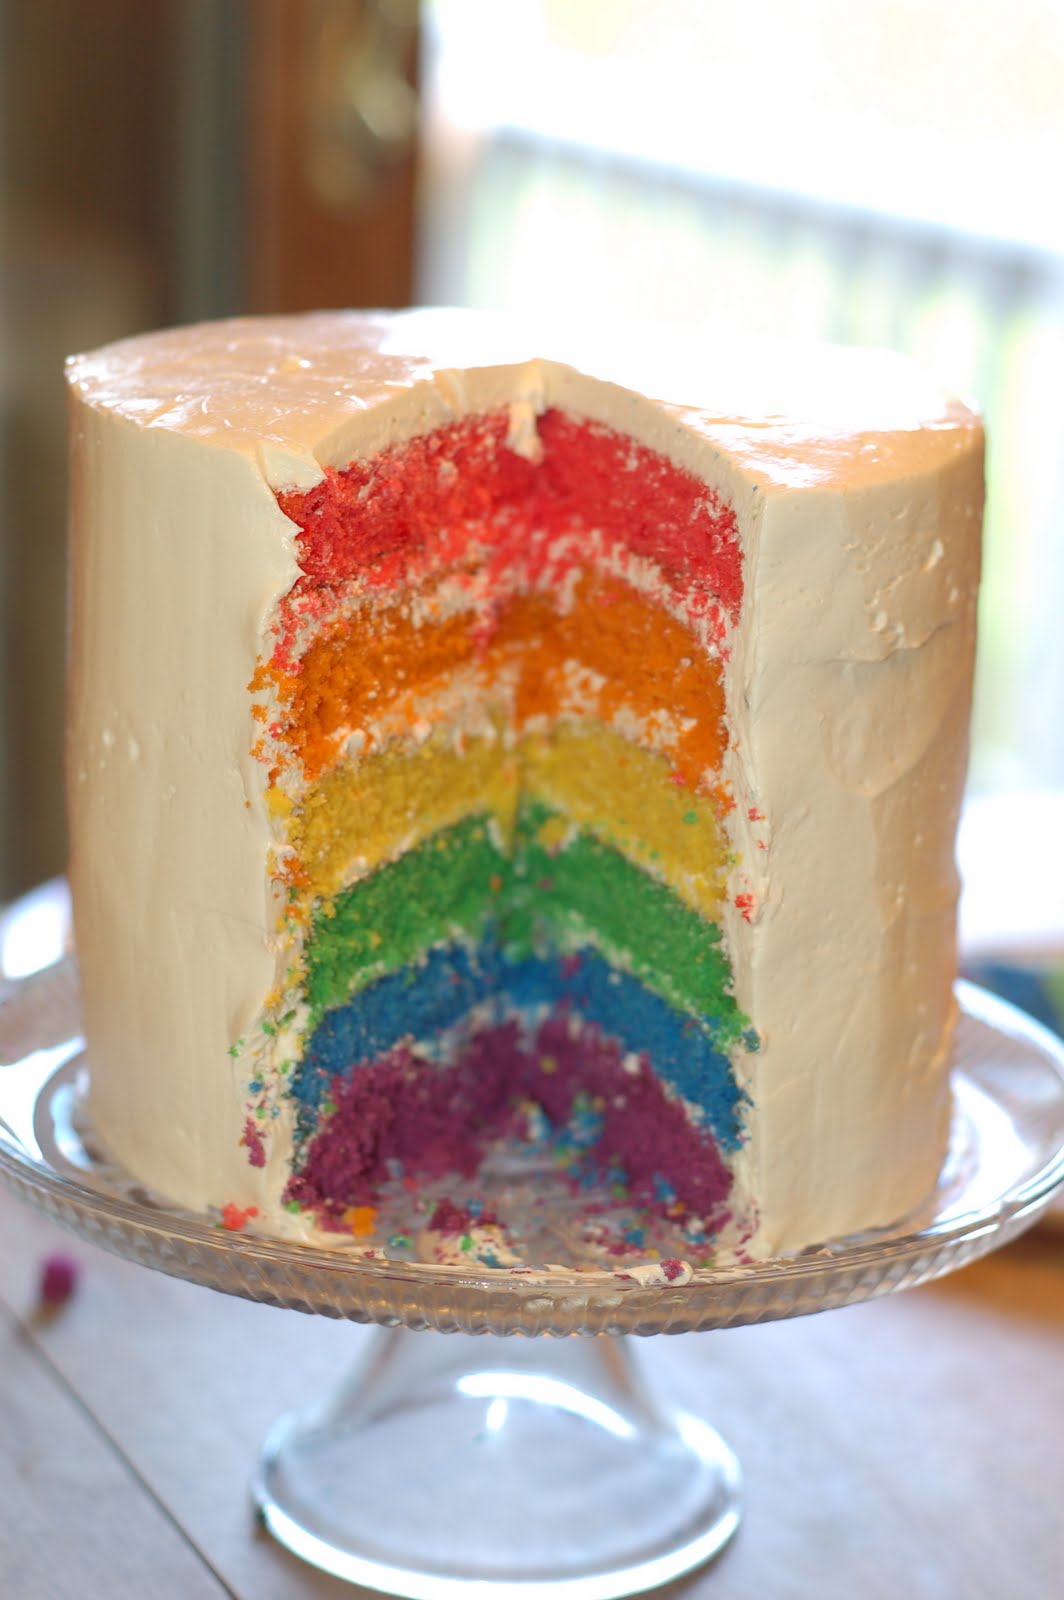
We had an eventful weekend. More about that later. But I wanted to share this.  I made this cake for a family gathering this weekend:
A little closer:


When people saw this creation, the conversation went like this (over and over again):
Guest: How many layers is THAT?!
Me: . . .(blank stare... coy grin)
Guest: What kind of cake is it?
Me: . . .Huh?
Guest: Ha Ha! I'm not gonna get an answer am I?
Me: How was your drive up?

That pretty well built up some suspense until it was time to let people dive into it. People actually gathered around to see what was in this thing!  And when they did! There was actually a few shrieks! Nobody has ever shrieked when I cut a cake before... Anyways, here it is, blow by blow.  I hope if you feel the urge to shriek, please do!


With frosting and cake layers the dimensions round out at: 7 inches tall and 9 inches wide.
How does one plate a slice of cake of this magnitude? Very carefully!  At first I tried a pie server and knife. It did the job if that was all you have.  But what worked ultimately, was two long knives. It worked best like this:


These were rather large pieces and so people shared.  Half a cake was PLENTY for 16 people.

So, here is the recipe for the Ultimate Rainbow Cake:

White Cake (Soon to be Rainbow Cake)

4 sticks Unsalted butter, soft, but still cool
4 2/3 cups sugar
10 egg whites
4 teaspoons vanilla
6 cups flour
8 teaspoons baking powder
1 tsp salt
3 cups milk
Red, orange, yellow, green, blue and purple food coloring. I like the Wilton colors, but didn’t have every color and the regular liquid ones worked just fine.

Preheat the oven to 350F degrees.

With a pastry brush, brush softened butter onto your 9 inch cake pans, they dust with powdered sugar, lay your parchment paper round into each pan. If you do not have 6 pans, divide this recipe by however many pans you do have.

Mix together the flour, baking powder and salt. Set aside.

Cream the sugar and butter with whisk attachment until the mixture lightens and become fluffy. Depending on how soft your butter is this will take anywhere from 3 to 7 minutes.

Add the egg whites one at a time. (But crack them into a bowl first so you don’t accidentally drop a yolk in) Add the vanilla and mix until fully incorporated.

Add, alternating, the flour mixture and the milk in 3 equal-ish additions.

Into six separate bowls, scoop two cups of batter each, making sure to use a spatula to get every last bit of batter into each bowl. Add your food coloring to each bowl and mix until you achieve the desired intensity you like. I wanted vibrant, so I added a little bit more than I thought necessary, which turned out to be a good thing.

When all is mixed (try not to over-mix so that you don’t make your cake tough); put your colored batters into each pan and deliver to the oven for 30 minutes. Depending on your oven, the time will vary, but the cake is done when it pulls from the sides and the center is firm, not jiggly.

Remove them from the oven, to a cooling rack in the pan until you can safely flip the cakes out. At this point, I flip the cakes every 20 minutes until they are cool, removing the parchment but not discarding it until you are ready to assemble your cake. If you choose to assemble your cake longer than several hours after they are cool, wrap them tightly in plastic wrap on the counter (up to 12 hours). More than that, refrigerate

Swiss Meringue Butter cream frosting (Allie’s Version)
10 large egg whites
2 ½ cups sugar
2 teaspoons Cream of Tartar
8 sticks unsalted butter, softened but still cool to the touch
2 teaspoons pure vanilla extract

(I did this in my Kitchenaid stand mixer’s stainless steel bowl)

Start a sauce pot of water to simmer on the stove. Place your bowl with sugar, egg whites and cream of tartar over simmering water. Whisk mixture constantly until the sugar is dissolved and a candy thermometer reads 140 degrees.

Remove and immediately transfer to stand mixer and whisk on medium. Let mixer mix until the bottom of the bowl cools to room temp. This may take more than 10 or fifteen minutes. At this point, the mixture will look like super silky marshmallow.

When you have a nice stiff mixture slow the mixing speed to medium low. Begin adding your butter, tablespoon at a time, making sure to let the butter incorporate fully before adding the next. It will make it look soupy for a bit then for a few moments near the end of adding it all in, it will look curdled. But it will smooth itself out and actually get light and fluffy! Add vanilla and whisk until just incorporated.

5.02.2010

New Pillows for the Couch with Tutorial!

I had some fabric left over from the stairs, and decided that these pillows on my couch needed to be replaced.  I mean, really, they are from the old couch that no longer exists...:
So, I decided I wanted to do a very simple "flange" styled pillow, because the pattern was so cool, it didn't need ruffles or other stuff.

And I actually documented the process! So I get a gold star for the day!

First: Cut your desired squares of fabric.  Measure your pillow form and add 2.5 inches on every side. 

Second: With right sides together, sew a half inch seam around all but about 8 inches of the square in the middle of one side; locking the stitches at the corners and ends.

Third: Clip the corners for nice corners when pressed. Be sure not to clip into your corner seam, but get as close as you can without weakening the seam.
Turn your case inside out.  (Now your right sides are out)

Fourth: Press your seams with an iron.  For crisp seams, use a pointer or seam ripper to pull the seam as you iron it.  Turn over and press the other side, also.

 Fifth: Pin your cover down and sew a seam 2 inches from the outer edge (on the right sides of your fabric), Again, leaving the same edge open several inches so that you can get your pillow-form squeezed in.

Sixth: Open your old pillow and get your stuffing out, OR open your pillow-form from its plastic wrap.

Seventh: Carefully push your stuffing in and start to pin your opening closed at least 3 inches from the edge.  This will make it so that you can sew it closed without growing two more functioning arms.  However, you may find that you still will need two more arms... So, ask your trusted sewing companion to come squeeze and help guide your pillow through the machine while you sew a straight line- It's actually a fun trick that will impress your guests... Ok. It's not, but it certainly will make you laugh (or curse) while you are doing it. But I digress.
Sew your opening shut.
Then slip stitch the outer edge together and Voila!

Eighth: Rinse and Repeat!

I hope you all enjoyed my first tutorial.  Let me know if there are more tutorials that you would like to see. 

4.29.2010

Some Fast Makeovers

So, in preparation of some family visitors, I decided to make the stairs down to the lower level a little more fresh and nice.  That really is a nice way to put it.  The stairs were the original "working" stairs meant to be covered with long fiber carpeting. Being the allergic family that we are, we do as little of the porous fibers that we can. So, not carpeted stairways.  So, how does one make utility stairs look nice? Be Crafty! 

I had the thought to decoupage some great paper I had found, but did not hat enough to do all of the stairs. So, we set out to find some more.  We went to our neighborhood Hobby Lobby. No such luck.  But I did find a darn near perfect match to the paper.  Only it was even better!  It was fabric! It is way more durable than paper would be, and no matching prints!  Yay!

So, the rises all got a fresh coat of white paint for a nice even base.  When the paint had dried overnight I was ready to decoupage the fabric on.  I measured each strip of fabric and cut then slapped on the Modge-Podge and stuck the fabric on.  Once all the fabric was smoothed, I slathered on some more decoupage.

The treads also got a little face-lift.  With wood grain contact paper!  Then a layer of Clear contact paper for durability.  I think they look FANTASTIC!  And they are totally me! Pink, graphic and a bit "peek-a-boo-ish". Here is the finished project:
When the real treads go in, the rises will have to be replaced also, and I will be disappointed to see them go...

I also wanted to let my bestie, Hollie and her family, Ginger and her family, and also their brother and sister and their families, and their mother Kaye and family that our thoughts and prayers are with them today.  And that I love you!

4.27.2010

A Craft Fail. Sort of.

I have a daughter who has recently shown herself to be an undercover Disney Merchandising Agent.  You see, we thought that she just loved those Disney Princesses.  I had learned to strategically avoid the toy department at most retailers. But then, whenever we were in line at the grocery store she would spot them on the bottom shelf - all the way from the cart. Et-cetera, Et-cetera.
Well, lately, it seems that Disney Princesses get spotted EVERYWHERE.  And I do mean everywhere. For example, today in the canned vegetables isle; I hear the "Princess Shriek".  Sure enough I turn to look at what the Dearest (and nearest) Princess is getting all excited about.  Sure enough, there is one of those naughty isle scammers... And it was Disney Princess Finger Press-On Nails... in miniature. Ugh. And really there is no "trading" items to get out of buying those.  The stuff is like "crack-for-toddlers", I swear! So, its buy them or drag her out screaming at the top of her lungs like I'm trying to abduct her.. Gotta love a 3 year old. And Disney Merchandisers. The stuff is everywhere.
Anyway, AuBrynne Loves homemade clothing.  And she loves when I put a Disney Princess iron-on if at all possible.  So, when I say them clearanced at Joann's for less than $1, I had to treat her to a summer tunic. 
Well, because I did not measure her, I thought I would just rely on an old (1 month) pattern.  Well guess what? Its too short.  Too short to wear off the beach....


But just try getting it off the girl.  I dare ya!  So, tonight, it is pajamas.  If I can get it off of her in the morning, it will get a cute little ruffle to make it several inches longer. I swear, she's going to be a WNBA player. Or an OlympicVolleyball player...
At any rate, the iron-on is this month's favorite Princess, Belle.  I added some cute hotfix rhinestones in Canary and Fuscia for a little bling.

A Frock By Friday

Check out this lovely Tutorial Series from Grosgrain called :  A Frock By Friday . It is a great way to get your feet wet if you are afraid to delve into sewing a dress for yourself without the use of a store bought pattern!

4.26.2010

Clock Make-Over

Today, among a load of errands, I was able to re-do this wall clock that I had found at Walmart in a clearance bin for a a whole $1.99. It matched the color of the Plum that was to be the color of my room.  But I have not gotten to painting it.  So, I thought I would re-do it to finally get the decor in AuBrynne's room closer to finished.  It started outlike this:
With a couple of sheets of paper cut with a fabulous Cricut and some extra pearl stickers and plastic rhinestones; I was able to get it disassembled and put back together to look like this:


So, the next few projects are going to be getting AuBrynne's room finally together... Ya know she's 3.  So, its probably time before she decides to tell me its not what she wants.

4.25.2010

Ombre Manicure

So, I have figured out a really good method for the at home manicure that lasts a whole week.  Its more or less a "Sandwich" method. I use a product called Sticky made by Creative. An enamal color and then Super Shiney also by Creative.  The trick to this is to use THIN coats. If you wait at least 6 minutes between each coat, you can do it 20 minutes before bed and not have any sheet marks in the morning. It goes like this:
1: Stickey
2: Color
3: Stickey
4: Color
5: Stickey
6: Super Shiney
7: Spray Solar Spray Quick Dry
8: Drop of Solar Nail Cutical Oil on each cuticle
Generally at this point, I run my finger tips under the coldest tap water I can stand for a minute.

This week I did what my mother called an Ombre Manicure.  I used OPI Pompeii Purple and on the tips I used OPI Designer Series Coronation. It turned out pretty neat!

Labels