
Yay! It's Thursday! Which means it's Making it With Allie Linky Party!

For my submission to the party, I am submitting the tutorial on how to make these
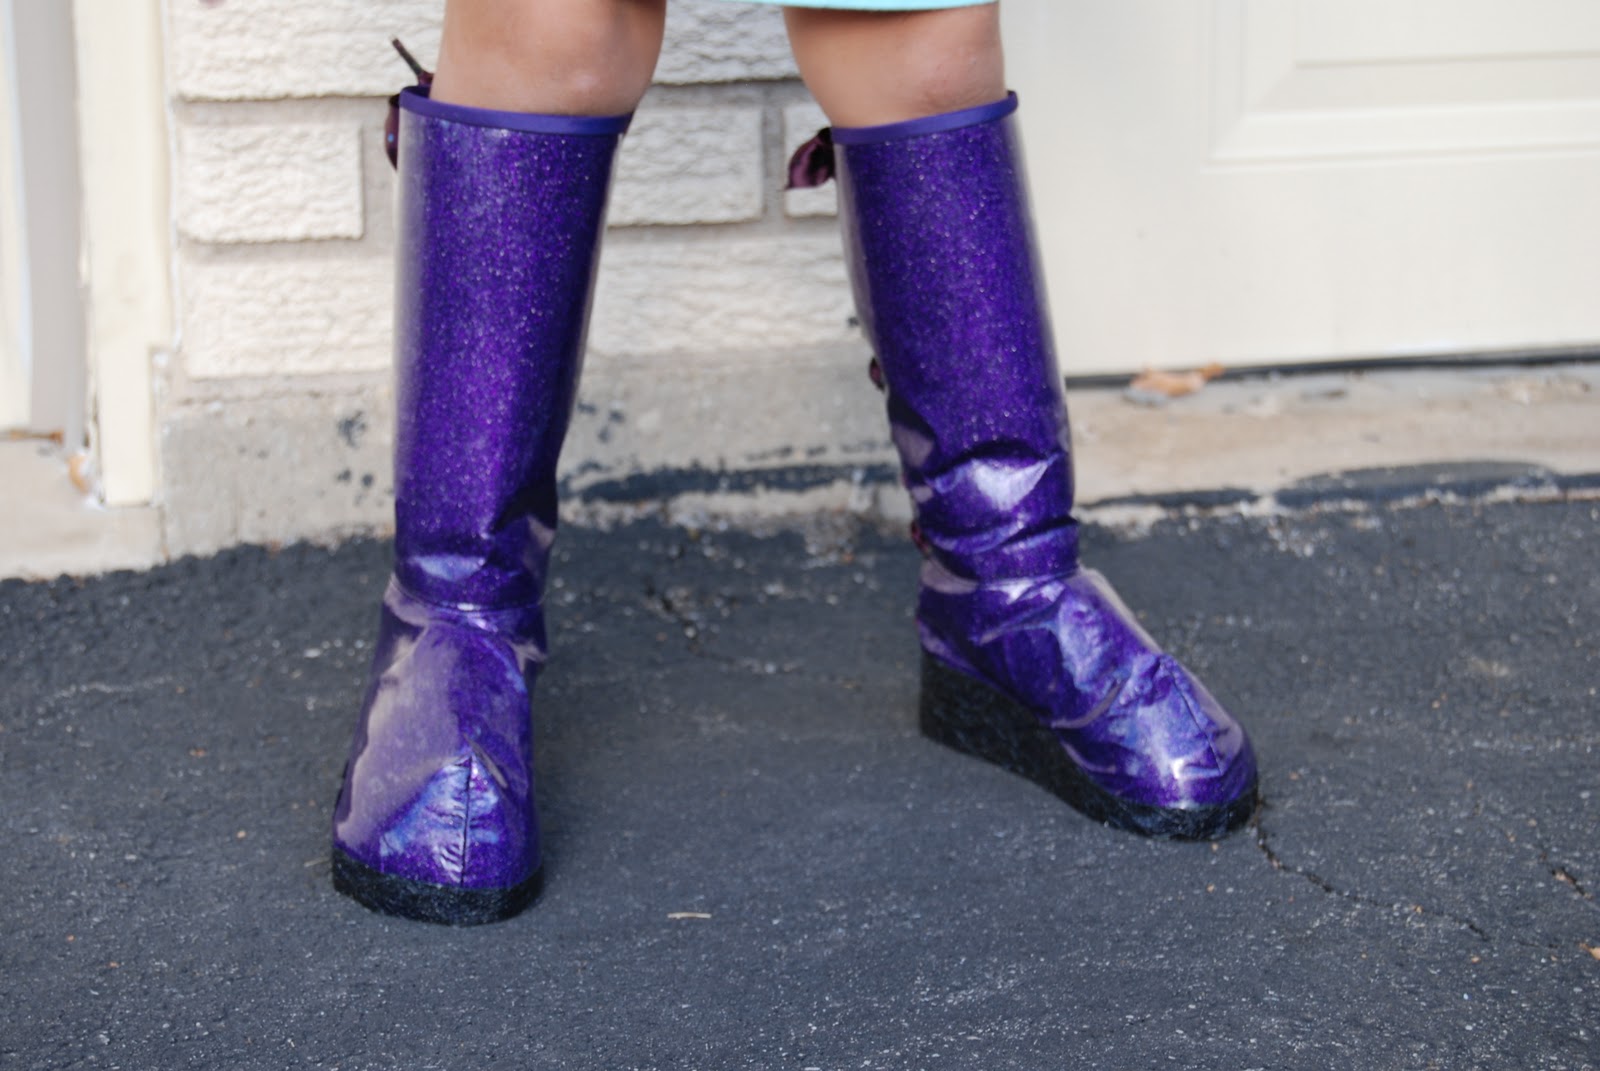
Extreme Bling Boots

Now, I am going to preface this with 2 points:
First, this is a pretty long process.
Second, These are Costume Boots, Not boots for any kind of "weather"
You will need:
Pair of Foam style flip-flops
Slurpee Lid
Muslin Fabric for mock up
Woven fabric
Extreme Glitter Paint in coordinating color to fabric
Interfacing (fairly stiff stuff)
Iron on Vinyl
Contact Cement, NOT Rubber Cement, as RC will not work, trust me!
Grommets
Take a breath!
Ok. Here it goes:

2: Secure one to the front lip of your Flip-flop
3: Wrap your little one in her flip flop and wrap 3-4 layers of Saran wrap
4: then 3-4 layers of duct-tape
5: Very carefully cut off the Duct-tape boot
6: Remove shoe and finish cutting through back side of the boot.
Measure that length and use it for a reference through the making of the rest of the boot.

1: Tape up the back seam to stabilize the boot. This is now your form.
2: Begin draping and pinning your muslin fabric onto your form.
Try to keep the grain perpendicular at the front center line of the boot
3: Pull and stretch and pin your muslin till you have a 90% smooth surface
That other 10% will get fixed shortly
4: Mark your grain line and back seams on the bottom piece.
5: Mark and then cut the bottom of the shoe line
Mark the line at the ankle where you cut off the lower fabric excess.

1: On the upper piece, begin draping again; keeping the grain line vertical at the center line
2: Cut off the excess at the same line you cut off the lower excess
3: Pin all the way around to back opening
4: Layout your muslin pieces.
Make an extra set that is a mirror of the original.
5: Take one set and sew them together, lower to upper to see how it fits on your form.
6: See the excess at the toe? Pin that together and sew it. It should end up as an arc.


Please Feel Free To Add It! :)
Go on Link It Up!
This linky list is now closed.
2: Cut off the excess at the same line you cut off the lower excess
3: Pin all the way around to back opening
4: Layout your muslin pieces.
Make an extra set that is a mirror of the original.
5: Take one set and sew them together, lower to upper to see how it fits on your form.
6: See the excess at the toe? Pin that together and sew it. It should end up as an arc.

1: Pin it onto your form for one last fit. It should fit pretty snugly.
If there is excess fabric, pinch and sew it. But that should really only be done at seam lines.
2: Cut out your fabric pieces, two of each upper and lowers (mirrors and not mirrors)
3: Cut and apply your interfacing.
4: Paint 3 to 4 layers, depending on how Glittery you want your boots, onto your fabric.
Let it get COMPLETELY dry between each layer.

1: Cut out your Iron on Vinyl. Apply it according to the directions on the package.
**Be Careful not to get your hot iron onto painted fabric or onto vinyl**
2: You should end up with this cool plasticized fabric
3: Clip your curves so that you can sew the seam together more easy
4: You should have something like the above pic

1: Apply your Contact cement to your Slurpee lid and then to the lip of your flip-flop.
Let them sit for fifteen minutes or so, then smoosh them together
2: Sew on some bias tape (same fabric you used only unpainted) to the back edge
3: Mark and make your grommet holes; Slip in the front grommet piece
4: Slip on the back ring
5: Crimp them together
6: You will have this, repeat with all your grommets
Then all you have to do is lace them up!
I used Ribbon.
And that, friends, is how you make the boots from this costume!

So, if ANY of this is unclear, please do not hesitate to drop me a message with your question, because clearly, I am not good at this tutorial business! But I will work on it :)
Have you visited my Linky-Party Directory ?
If your linky party is not listed because I have not linked there, or maybe don't know about it.Please Feel Free To Add It! :)
Now it's your turn!
I can not wait to see what you all have been up to this week!
It doesn't have to be a tutorial, but if it is, that's great too!
Grab a button and place it somewhere on your blog, I'm not picky!
Or even a text link is cool too!
Link up your direct post link to however many projects you like!
The more the merrier!
Visit some other links and give'em some luv! Leave them some kind words!
Go on Link It Up!


Very ingenious! The boots are amazing and I can't believe you made them yourself!!
ReplyDeleteOMGoersh! I cannot even begin to wrap my head around all of that. You are amazing...I've said it before and I had to say it again! Thank you so much for this tutorial. I will be attempting these...one day. ;)
ReplyDeleteAngelene
LBT
http://littlebuggietutu.blogspot.com
That is some tutorial! Good thing you thought to take pics as you were making them :)
ReplyDeleteThat costume is amazing and the boots are fabulous! wow! what a great job! thanks for your nice comments and linky party!
ReplyDeleteThat has got to be the COOLEST tutorial EVER! those boots are AWESOME!!!!!
ReplyDeleteI never would have guessed that those boots started as flip flops! Wow! Amazing!
ReplyDeleteThe boots are amazing! Thanks for the party and for linking to Fantabulous Friday!
ReplyDeleteThose boots are awesome, how did you ever come up with where to even start?
ReplyDeleteI cannot even IMAGINE how much time you put into those boots! Well worth the effort.. they are Amazing!
ReplyDeleteI can't believe you are going to feature my little strawberry dress! You've made my Monday...thanks Allie..xox {Do I put the 'featured button' on my blog on Thursday?}
ReplyDeleteHi Allie! I gave you and your little witch a feature on my blog @ http://pinkapotamus.blogspot.com/2010/11/pink-hippo-party-2.html
ReplyDeleteHope you'll grab a featured button and come link up again this week!
I seriously cannot believe you made those - you are a superstar. I want a pair!
ReplyDeleteWhat an amazing costume. How creative you are with the boots. She is adorable.
ReplyDelete